This is Part 4 of the Solana Program Lifecycle series. In Part 3 we saw that a program is two accounts: a 36-byte Program Account that points to a ProgramData Account holding the actual bytecode. Now we look at how those two accounts get created and replaced.
The short version: there is a third account involved. A temporary one. It exists only during the deploy or upgrade, and if anything goes wrong, it can sit on chain holding your SOL until you reclaim it.
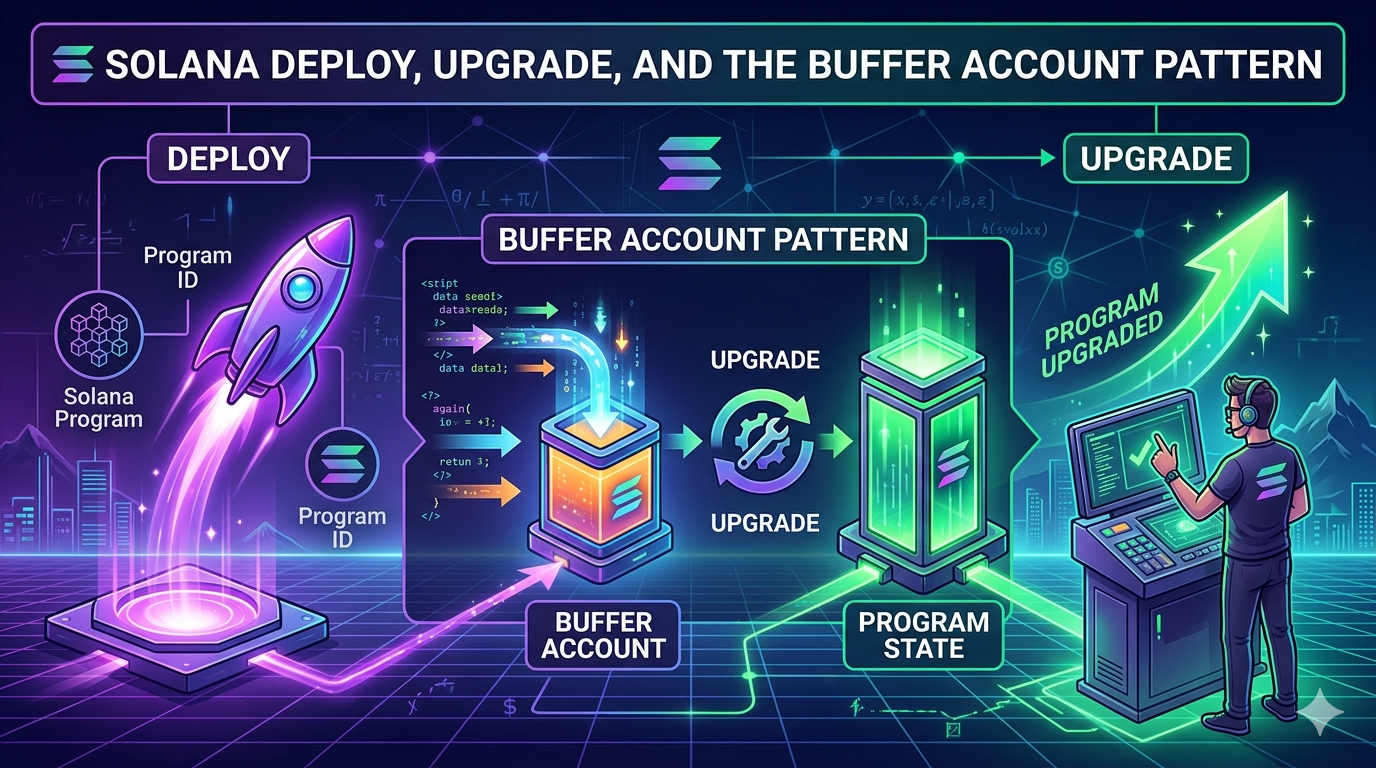
That third account is the Buffer.
Why a deploy is not one transaction
A Solana transaction has a hard upper limit of 1232 bytes. That covers the signatures, the message header, the account list, and the instruction data. After overhead, the usable instruction payload is roughly 800 to 1000 bytes per transaction.
A typical Anchor program is between 200KB and 500KB of compiled ELF bytecode. The math does not work. There is no way to fit the bytecode of a real program inside a single transaction.
So Solana splits the work across many transactions. The bytecode lands in a holding area first, then gets activated in a final step. That holding area is the Buffer Account.
The flow is the same for first-time deploys and for upgrades. Only the activation step differs.
Build .so file (offchain)
   |
   v
Create Buffer account onchain
   |
   v
Write bytecode in chunks (many transactions)
   |
   v
Activation: either DeployWithMaxDataLen or Upgrade
   |
   v
Buffer drained, lamports forwarded
Each chunk is a separate transaction. Each transaction pays a fee. solana program deploy hides all of this from you, but it is doing dozens to hundreds of transactions on your behalf.
The Buffer account, in detail
A Buffer account is just a regular account, owned by the BPF Loader Upgradeable program, with a specific layout. Recall the discriminator table from Part 3:
| Value | Variant |
|---|---|
| 1 | Buffer |
| 2 | Program |
| 3 | ProgramData |
A Buffer carries a 37-byte header followed by raw program bytes:
[0..4]   u32 discriminator = 1
[4..5]   u8 option (1 = Some, 0 = None)
[5..37]  Pubkey authority_address (present if option = 1)
[37..]   raw program bytes (uploaded in chunks)
The authority_address field is the gate. Only the buffer authority can write more bytes into the buffer, change the buffer authority, or use the buffer to deploy or upgrade a program. If you create a buffer and walk away, nobody else can use it. The bytecode inside is locked to your authority.
The buffer pays rent for its full size. A 400KB buffer holds about 2.79 SOL of rent-exempt lamports. That SOL is yours, but it is locked in the buffer until either the activation step drains it (success path) or you close the buffer manually (failure path).
The full deploy flow, instruction by instruction
When you run solana program deploy ./target/deploy/program.so, the CLI performs this sequence. The relevant loader-v3 instructions are documented in solana_loader_v3_interface::instruction.
Step 1: Create the Buffer account.
The CLI calls the System Program to allocate an empty account, sized for 37 + max_data_len bytes, funded to rent-exemption. Then it calls InitializeBuffer on the loader, which writes the discriminator and authority into the first 37 bytes.
System Program: CreateAccount → empty account, owned by loader v3
Loader v3:      InitializeBuffer → sets discriminator and authority
Step 2: Write the bytecode in chunks.
The CLI calls Write repeatedly. Each Write instruction takes an offset and a slice of bytes, and copies them into the buffer at that offset. Each transaction carries one Write instruction with as much payload as fits inside the 1232-byte transaction limit.
For a 400KB program with about 900 bytes of payload per transaction, that is roughly 450 transactions. The CLI sends them in parallel where possible, retrying on failure, until every byte has landed.
This is the slow part. It is also the part most likely to fail on a congested network. If the RPC drops some of these transactions, the buffer ends up with holes in it, and the activation step will reject the bytecode.
Step 3: Activate with DeployWithMaxDataLen.
Once the buffer is full, the CLI sends one final transaction with the DeployWithMaxDataLen instruction. This instruction does several things atomically:
- Creates the Program account at the program ID address.
- Creates the ProgramData account at the derived PDA.
- Reads the bytecode from the buffer, verifies the ELF, and copies it into the ProgramData account.
- Sets the ProgramData account’s
upgrade_authority_addressto whoever signed. - Marks the Program account
executable: true. - Drains the Buffer account and truncates its data. The buffer’s lamports cover the rent for the new ProgramData account.
After this single transaction lands, the program is live. Any transaction in the next slot can invoke it.
The accounts touched by DeployWithMaxDataLen:
0. [writable, signer] Payer for the new ProgramData account
1. [writable]         The new ProgramData account
2. [writable]         The new Program account
3. [writable]         The Buffer (where bytecode was uploaded)
4. []                 Rent sysvar
5. []                 Clock sysvar
6. []                 System program
7. [signer]           The program's upgrade authority
The buffer’s authority must match the upgrade authority that signs the deploy. The loader checks this and rejects the deploy if they differ. This is what prevents an attacker from creating a buffer in your name and tricking you into deploying it.
The upgrade flow is shorter
Upgrading an existing program reuses Steps 1 and 2 from the deploy flow exactly. The only difference is the activation step.
Instead of DeployWithMaxDataLen, the CLI sends Upgrade. From the runtime source:
When
UpgradeableLoaderInstruction::Upgradeis processed, the runtime verifies the Program account is writable and owned by loader-v3, verifies the Buffer account contains a Buffer state with the correct authority, verifies the ProgramData account’supgrade_authority_addressmatches and is not None, verifies the program was not already deployed in the current slot, loads and verifies the new ELF bytes from the buffer, copies the new bytecode from the buffer into the ProgramData account and zeros remaining bytes, funds the ProgramData account to rent-exemption, drains the buffer account and truncates its data.
The new version becomes effective in the next slot (deployment_slot + 1).
The Program account does not change. The programdata_address pointer does not change. Only the bytecode inside the ProgramData account is replaced. Everything that referenced the program ID before the upgrade still works after.
The Upgrade instruction takes a fourth account that the deploy version does not: a spill account. The buffer’s lamports first top up the ProgramData account to rent-exemption, and anything left over lands in the spill account. The CLI defaults this to the deployer wallet, so the SOL comes back, just by way of a couple of hops.
Three constraints to remember:
- The buffer authority must match the program’s current upgrade authority. The loader rejects the upgrade if they differ. This is why you cannot upgrade someone else’s program even if you can create a buffer with their bytecode.
- You cannot upgrade twice in the same slot. The slot check (
clock.slot != slot) prevents this. If you try, you get an error and have to wait for the next slot. - The new bytecode must fit in the existing ProgramData account. If your upgrade is larger than the original
max_data_len, you must extend the program first withsolana program extend, which costs additional rent.
Why splitting upload from activation matters
The buffer pattern looks like extra ceremony, but it solves three real problems.
Atomicity. The activation step is a single transaction. Either the program ends up with the complete new bytecode, or it does not. There is never a moment where the program has half of the new bytecode and half of the old. The buffer accumulates all the writes without touching the live program, then commits them in one shot.
Multisig and governance. The party that uploads the bytecode and the party that authorizes the deploy do not have to be the same. A developer can write a buffer using a hot wallet, transfer the buffer authority to a multisig, and then have the multisig approve the Upgrade instruction. This is how teams using Squads or SPL Governance ship upgrades.
The flow looks like:
| |
Once the multisig signs the upgrade, the program is updated and the buffer’s lamports flow to the spill address the proposal specified. The multisig signers never had to handle the raw bytecode themselves. They only verified the buffer hash before approving.
For verifiable builds, the solana-verify get-buffer-hash <BUFFER_ADDRESS> command lets multisig members confirm that the buffer onchain matches the bytecode produced by a known build.
Failure isolation. If the upload fails halfway through, the live program is unaffected. The buffer is corrupt, but the existing ProgramData account is untouched. Compare this to a hypothetical model where chunks were written directly to the ProgramData account: a partial upload would leave the live program in a broken state.
When deploys fail (and they do)
Real-world deploys fail more often than the docs admit. The most common causes are RPC congestion, insufficient SOL in the deployer wallet, and transient network issues during the chunked write phase.
When a deploy fails partway through, you end up in one of three states:
State 1: Buffer was created but writes failed. You have an account onchain holding rent SOL with partial or no bytecode. The CLI prints something like:
Error: Data writes to account failed: Custom program error
To recover the buffer, run `solana-keygen recover` and then
`solana program deploy --buffer <RECOVERED_BUFFER>`
State 2: All writes succeeded but DeployWithMaxDataLen failed. The buffer is complete but the activation never happened. Same recovery path.
State 3: The deploy succeeded but the CLI crashed before reporting it. The program is actually live. Run solana program show <PROGRAM_ID> to confirm.
For States 1 and 2, you have two options.
Option A: Continue from the existing buffer. The CLI prints a recovery seed phrase when it creates the buffer. Use solana-keygen recover to recreate the buffer keypair, then pass it back to the deploy command:
The CLI is smart enough to skip the chunks already written and only fill in the missing ones. This is the cheap path. You only pay for the writes that did not land the first time.
Option B: Close the buffer and start over. If the buffer is too far gone, or if you just want to ship a fresh attempt, close it:
This drains the rent SOL back to your wallet. Each buffer typically holds 2 to 3 SOL for a normal-sized program, so leaving them around is wasteful.
The cost of a clean retry is the rent for a new buffer plus the transaction fees for the writes. For a 400KB program with 450 chunked writes at typical priority fees, that is roughly 0.02 SOL in fees on top of the rent that gets locked and then returned.
The --max-len flag and extend
When you first deploy, the ProgramData account is created with a fixed size. The size comes from one of two places:
- The
--max-lenflag passed tosolana program deploy, when set. - A size sufficient to hold the current bytecode, when
--max-lenis omitted.
This size is the upper bound on subsequent in-place upgrades. If your bytecode grows past it, the upgrade fails with account data too small for instruction unless the account is extended first.
Modern Solana CLI versions auto-extend the ProgramData account during a redeploy when needed, which sidesteps the failure. Multisig flows that build the Upgrade instruction by hand do not get this safety net, so they have to call solana program extend themselves before the upgrade can land.
You can grow it manually with the solana program extend command:
| |
This adds 10000 bytes of capacity to the ProgramData account and pays the additional rent from the deployer wallet. There is no equivalent shrink command. ProgramData can only grow.
A common pattern for serious projects is to deploy with a generous --max-len value (for example, 2x the current binary) so future upgrades have room without needing an extend step. The cost is locking up extra rent SOL upfront. The trade-off is that upgrades become a single transaction instead of two.
Verifying the flow yourself
You can watch every step of this happen on devnet. Run a deploy with verbose output and you will see the buffer being created, the chunked writes, and the final activation:
| |
Or break it into manual steps to see the buffer in isolation:
| |
After the deploy, run solana program show --buffers again. The buffer is gone. Its lamports were transferred during activation, and the loader truncated its data to zero.
What catches developers off guard
Closed program IDs cannot be reused. If you run solana program close <PROGRAM_ID>, that program ID is permanently retired. Attempting to deploy a new program at the same address fails with Program <ID> has been closed, use a new Program Id. This is intentional. It prevents an old program ID, which other contracts may have hardcoded, from being silently swapped for new bytecode.
Closing buffers is not the same as closing programs. solana program close --buffers removes only Buffer accounts, not Program or ProgramData accounts. The --buffers flag is the safe one to run regularly. Closing a program account is the irreversible one.
Buffer authority defaults to the deployer wallet. If you want a multisig to control the upgrade, you must explicitly transfer the buffer authority before proposing the upgrade transaction. Forgetting this step leaves the buffer locked to your hot wallet and the multisig cannot use it.
The deploy can succeed even if the CLI reports failure. Network issues sometimes cause the CLI to time out waiting for confirmation while the activation transaction actually lands. Always run solana program show <PROGRAM_ID> after a “failed” deploy before retrying, otherwise you may waste another buffer’s worth of SOL on a no-op.
solana program deploy and solana program upgrade do roughly the same thing. The upgrade subcommand is a thin wrapper around the same flow, but it skips creating a new Program account when one already exists. Most people use solana program deploy for both. It picks the right activation instruction automatically based on whether the program ID exists.
Tying it together
Put it all in motion. You run solana program deploy. Behind the scenes, the CLI creates a Buffer account, writes your bytecode into it across hundreds of transactions, and then sends one final activation instruction that copies the bytecode into the ProgramData Account and drains the Buffer. The program is live.
If the write phase fails, you end up with an orphaned Buffer holding SOL. If the activation fails, the buffer is complete but the program is untouched. In both cases, the live program is fine. The Buffer pattern isolates failures. solana program close --buffers reclaims the SOL.
The upload-then-activate split has a useful side effect: the party that uploads the bytecode does not have to be the party that approves the deploy. A developer writes a buffer, transfers its authority to a multisig, and the multisig approves the upgrade. That separation is what makes team-controlled and governance-controlled upgrades possible.
Part 5 covers the upgrade authority itself, from a single keypair through Squads multisigs and SPL Governance, all the way to the irreversible --final flag that freezes a program forever.